Send an e-mail via Powershell script using Send-MailMessage

$password = ConvertTo-SecureString 'YourSmtpAccountPassword' -AsPlainText -Force
$credential = New-Object System.Management.Automation.PSCredential ('YourSmtpUsername', $password)
$smtpServer = "smtp.yourdomain.com"
$smtpPort = 587
 
$from = "sender@yourdomain.com"
$to = "recipient@yourdomain.com"
$subject = "Your e-mail subject"
$body = "Your e-mail text"
 
Send-MailMessage -SmtpServer $smtpServer -Port $smtpPort -UseSsl -From $from -To $to -Subject $subject -Body $body -Credential (Get-Credential $credential)

In order to run that as a powershell script you may need to run (at least) “Set-ExecutionPolicy RemoteSigned” in a privileged powershell. The script is configured to use a secure connection to your SMTP server (SSL/TLS) on port 587.
wiki.js podman script

Recently I wanted to test wiki.js on my CentOS 8 Stream VM and ran into all kinds of problems. I found a helping script at https://books.clusterapps.com/books/containers/page/pod-scripts but it needed some refinement and correction.

Remember, this is for quick testing only. Especically the chmod 777 is something you do not want to do on a production system.

export DATA=$PWD
export PASSWD=zo03gaeCi1
mkdir -p $DATA/wiki/pgdata 
mkdir -p $DATA/wiki/data
chown -R 1000:1000 wiki
chmod -R 777 wiki
podman pod create --name wiki -p 3001:3000
podman run -d --pod wiki --name wiki_db -e POSTGRES_PASSWORD=$PASSWD -e POSTGRES_USER=wiki -e POSTGRES_DB=wiki -v $DATA/wiki/pgdata:/var/lib/postgresql/data:Z docker.io/library/postgres
podman run -d --pod wiki --name wiki_srv -e DB_TYPE=postgres -e DB_HOST=wiki -e DB_PORT=5432 -e DB_USER=wiki -e DB_PASS=$PASSWD -e DB_NAME=wiki -v $DATA/wiki/data:/wiki/data:Z ghcr.io/requarks/wiki:2

The pod is created permanently (so the data you have entered for testing will not be lost after stopping / quitting / rebooting). After you are done with testing you can stop it with:

podman pod stop wiki

Aaaand if you want to do more testing you can start it up again with:

podman pod start wiki

XBOX 360 Wireless Receiver not working after update to Windows 10 2004 Build 19041.610

After updating to the latest Windows 10 version my XBOX 360 wireless receiver was not recognized anymore and shown as “unknown device” in the device manager.

To fix this you´ll need to modify the “xusb21.inf” file that comes with the driver package as explained in this video:

You might have some trouble with enabling the testsigning for the now modified driver, especially if you are runnig Windows 10 Home. To fix this reboot your PC with this command "shutdown.exe /r /o /f /t 00".

Your pc will then boot into the advanced Windows options and there you can deactivate the driver signing for the next restart. Then you can install the unsigned driver, reboot the machine and enjoy your wireless controller working again.

Citrix Receiver SSL Error 61 – DigiCert Global Root G2 not trusted

When you´re trying to connect to a remote machine / desktop / application you might get SSL error 61 from the Citrix Receiver saying that the DigiCert Global Root G2 certificate is not trusted.

The solution for this on a typical Windows 10 Machine is:

  1. Go to the DigiCert website https://www.digicert.com/digicert-root-certificates.htm and download the DigiCert Global Root G2 certificate (right click “Save as”).
  2. Open the start menu of Windows 10, type “cert” and choose “Manage computer certificates”
  3. Select “Intermediate Certification Authorities” and then “Certificates”
  4. Right click in the window on the right and select “All tasks” -> “Import”
  5. Select “Next”, then choose the certificate you have downloaded in step 1
  6. Choose “Select certificate store atutomatically” and then finish the import process
  7. You´re done :-).

Irfanview on Mac OS X

Since I´m still relatively new in the use of Mac OS I sometimes miss some Windows apps. One of these is Irfanview which is not natively available for Mac OS. But there´s a simple solution for that:

  1. Download and install Quarz – https://www.xquartz.org
  2. Download and install Wine – https://dl.winehq.org/wine-builds/macosx/download.html – I recommend using the Wine Stable installer. When installing be sure to activate the checkbox with the 64-bit support.
  3. Download Irfanview and extract it to a folder of your choice (e.g. Desktop/Downloads/Irfanview) – https://www.irfanview.com/64bit.htm – Be sure to download the ZIP version and NOT the installer.
  4. Optional – download Irfanview plugins and extract it into the plugins subfolder of the folder where you’ve extracted Irfanview (e.g. Desktop/Downloads/Irfanview/plugins) – https://www.irfanview.com/64bit.htm – Again be sure to download the ZIP version.
  5. Start Irfanview by double-clicking the irfanview.exe file in the Irfanview folder. Wine will then do its initial setup and needs to download Mono add-ons (required for .NET applications like Irfanview).
  6. After that Irfanview launches and you’re good to go.

Apple Mail – neueste e-Mail in Konversation oben anzeigen

(only in german – sorry)

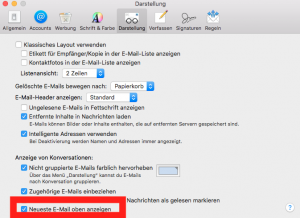
Die Konversationen in Apple Mail sind äußerst nützlich. Wer die neueste e-Mail in der Konversation nicht unten, sondern oben stehen haben möchte, muss dazu Folgendes tun:

Mail => Einstellungen => Darstellung => Haken ganz unten setzen bei “Neueste e-Mail oben anzeigen”


Nested CSS with pseudo class

Lately I had a bit of an design issue with a web front end based on classical php/html/css. I wanted to display images in different sizes on different pages. But I wasn´t able to touch the php / html source so my only chance was to work on the css. But – I also wasn´t able to touch the css (pseudo) classes or introduce new ones.

After quite some time of research I discovered, that CSS offers a great way to nest statements so here is what I´ve done.

The original CSS class looked like this:

.td_value_details {
vertical-align: top;
}

And here is how I nested my image size statement in it:

.td_value_details img {max-width: 600px; height: 350px;} {
vertical-align: top;
}

I really didn´t know that this was possible and I´m pretty sure it´s not best practice, but it really does the job.


Howto get the relative path of a file / folder in Unix / Linux with PHP

Sometimes you´ll need the relative path of a file or folder stored on your webserver. Especially if you´re one a shared environment this can be a bit tricky sometimes.

Here is a short and easy solution for your problem:

  • create a php file named ‘fullpath.php’
  • open the file and enter the following php code
  • <?php
    $dir = dirname(__FILE__);
    echo "<p>Full path to this dir: " . $dir . "</p>";
    echo "<p>Full path to a .htpasswd file in this dir: " . $dir . "/.htpasswd" . "</p>";
    ?>
  • upload the file to the folder on your webserver which you want to know the path (f.e. www.yourwebserver.com/yourfolder/)
  • open your webbrowser and go to the location you´ve uploaded the file (f.e. www.yourwebserver.com/yourfolder/fullpath.php)
  • enjoy your relative path (which could look f.e. something like this  ‘/var/www/vhosts/yourwebserver.com/httpdocs/yourfolder’)
  • Note: if you plan to use this relative path for other applications you may need to add an additional ‘/’ at the end (‘/var/www/vhosts/yourwebserver.com/httpdocs/yourfolder/’)

Source: http://www.htaccesstools.com/articles/full-path-to-file-using-php/

Virtual Box CompareExchange128 Error on Windows 10 install

If you get the “CompareExchange128” error – a CPU related error  – when trying to install Windows 10 with VirtualBox, Dirk Strauss has the solution for you:

  • shut down the vm
  • open a cmd prompt and point it to the installation directory of your VirtualBox (most likely C:\Program Files\Oracle\VirtualBox)
  • then type “vboxmanage setextradata [vmname] VBoxInternal/CPUM/CMPXCHG16B 1”
  • don´t forget to replace [vmname] with the name of your virtual machine (I had some trouble with blank spaces, so you might wanna rename your VM for a second)
  • restart the vm
  • install Windows 10

New theme & Google Mobile Friendly Test

Due to Google´s recent changes in their search index ranking I had to switch to a “more” mobile compatible theme (as an iOS user I personally really don´t care).

So here it is. In case you may ask why, here´s a brief explanation:

1.) Google decided that websites looking ugly on mobile devices will get a poorer ranking

2.) Nobody wants to fall down the index, so you´ve got to make your website look better on mobile devices (by Google standards)

3.) The mobile guide will help you with more information: https://developers.google.com/webmasters/mobile-sites/?hl=en-EN&utm_source=MFT&utm_medium=incoming-link&utm_campaign=MFT

4.) The mobile friendly test will show if you have a ugly or a good looking website on mobile devices:  https://www.google.com/webmasters/tools/mobile-friendly/

For those of you familiar with the german language I made a short video explanation: